


Virtual Accessories For Homebridge
Virtual Accessories For Homebridge is a plugin for Homebridge that provides the ability to create virtual HomeKit accessories.
📝 Table Of Contents
</summary>- About Virtual Accessories For Homebridge
- Installation
- Configuration
- Accessory Configurations
- Doorbell
- Fan
- Garage Door
- Heater/Cooler (Celsius)
- Heater/Cooler (Fahrenheit)
- Humidifier/Dehumidifier
- Lightbulb
- Lock
- Security System
- Speaker
- Valve
- Window Covering - Blinds, Shades
- Switch
- Switch with reset timer
- Switch with random reset timer
- Switch with companion sensor (sensor triggered on & off by switch state)
- Sensor with ping trigger
- Sensor with cron trigger
- Sensor with cron trigger with start and end datetimes
- Sensor with sun events trigger
- Webhook Service Configuration
- Creative Uses
- Mentions
- Known Issues
- What if I run into a problem?
About Virtual Accessories For Homebridge
This plugin is inspired by Nick Farina's most excellent 🎸 homebridge-dummy plugin, which formed the backbone of my HomeKit automations. This plugin is Homebridge Verified and is ready for Homebridge 2.0.
The purpose of this plugin is to provide a single solution for creating different types of virtual HomeKit accessories. In my automations it has replaced seven separate plugins, each of which provided part of the functionality I needed, and all of which had gone unmaintained or abandoned. Also, it became annoying to have to figure out which plugin provided what functionality, or managed which accessory, each time I wanted to make a change.
The downside to a single plugin is trading ease of accessory maintenance for a single point of failure. However, this is work in progress so I will be releasing bug fixes and updates. Also, I will slowly add new accessories and functionality, either as I need them, or, more likely, in response to requests by users who find this plugin useful.
Currently, these are the implemented virtual accessories:
- Doorbell. Allows you to use a button as a doorbell and have it play a chime on HomePods.
- Fan. Allows you to create a virtual fan and set rotation direction and speed.
- Garage Door. Allows you to create a virtual garage door. Generates a HomeKit notification when the accessory's state changes. CarPlay will display the Garage widget on the display when you approach your home.
- Heater/Cooler. Allows you to create a virtual thermostat/AC accessory. You can select heater only, cooler only, or heater + cooler combo. The heater/cooler temperature sensor can be updated via a webhook call. Based on the threshold values, the accessory will switch to the appropriate operating state, according to the supported states.
- Humidifier/Dehumidifier. Allows you to create a virtual humidifier/dehumidifier. You can select humidifier only, dehumidifier only, or humidifier + dehumidifier combo. The humidifier/dehumidifier humidity sensor can be updated via a webhook call. Based on the threshold values, the accessory will switch to the appropriate operating state, according to the supported states.
- Lightbulb. Allows you to create virtual white (on/off and brightness) and white ambiance (on/off, brightness, and color temperature) lightbulbs. In the Home app, this can be used as a dimmer switch.
- Lock. Allows you to create a virtual lock. Generates a HomeKit notification when the accessory's state changes.
- Security System. Allows you to create a virtual security system. Generates a HomeKit notification when the accessory's state changes.
- Speaker. Allows you to create a virtual speaker.
- Valve. Allows you to create different types of virtual valves: generic, irrigation, shower head, or water faucet.
- Window Covering. Allows you to create virtual blinds and shades.
- Switch. Allows you to create a number of different types of virtual switches.
- Plain old switches. What it says on the label.
- Normally on/off switches. The default state of the switch can be set to "on" or "off". This is also the default state when Homebridge restarts. If you pair it with a timer, the switch will revert back to the default state when the timer expires.
- Stateful switches. The state of the switch persists across restarts of Homebridge. This includes timed switches.
- Switches with companion sensors. The switch will trigger a companion sensor when it changes state, generating a HomeKit-native notification in the Home app. Selecting a critical sensor type will allow notifications to bypass Focuses like "Do Not Disturb". This is just the easier way of implementing a switch triggered sensor.
- Dimmer switches. To create a dimmer switch use a virtual lightbulb.
- Timed switches. This is a way to introduce timers into HomeKit. The switch will revert back to its default state when the timer expires. If the switch is stateful, the timer will be restored after a restart of Homebridge. While care is taken to restore the timer with the appropriate time correction, absolute accuracy is not guaranteed and should not be expected. The accuracy of the restored timer will be affected, among other things, by the hardware and software Homebridge is running on, the number of plugins installed, the order with which the plugins are restored, etc.
- Sensor. Allows you to create different types of virtual sensors. If Activity Notifications are enabled in the Home app, sensors will generate notifications when their state changes in response to a detected event. Some types of notifications, classified as
criticalby Homekit, are allowed to bypass Focuses likeDo Not Disturband some are allowed to appear in CarPlay. Sensors can be activated by different triggers. Currently, the available triggers are:- Host Ping trigger. Actvates the sensor after a configurable number of failed attempts to ping a network host. The sensor resets when ping is successful.
- Cron trigger. Activates the sensor when the time and date match the schedule deascribed by a cron expression. The sensor resets after a brief delay.
- Sun Events trigger. Activates the sensor when the selected event happens: sunrise, sunset, and golden hour (for the photographers among us). The sensor resets after a brief delay.
- Switch trigger. To create a switch triggered sensor, create a virtual switch accessory with a companion sensor. This is just the easier way of implementing a switch triggered sensor. A future version may provide the ability to create this pairing as a sensor with a switch trigger.
Installation
You can install this plugin via the Homebridge UI or from the command line by typing:
npm install -g homebridge-virtual-accessories[!IMPORTANT] Virtual Accessories For Homebridge has dependencies on platform-native libraries, which get compiled for that particular platform at install time. Therefore you will need to make sure that the platform you are installing this plugin on has the necessary build tools available. The official Homebridge Docker image and the Homebridge Linux (apt) install, both provide all the necessary tools. If you are choosing to install on other platforms, you will require the appropriate technical skills to do the necessary installs. I have neither the capacity nor the hardware to test installs on every platform that Homebridge runs on. Below are platform specific installation notes, which I will update as users of this plugin report issues.
[!IMPORTANT] If you manually update the Node.js version that Homebridge is running on, you will need to ensure that the platform-native library
raw-socketwill also be updated. Run the following commands immediately after the Node.js update:npm uninstall raw-socket npm install raw-socket
[!CAUTION] Due to Virtual Accessories For Homebridge using platform-native modules, when updating Node.js, if the
raw-socketmodule is also not updated (see above), it may cause the plugin to fail to load and Homebridge to delete all of the plugin's accessories. It is therefore strongly recommended to toggle theKeep Accessories Of Uninstalled Pluginsoption to on, at least while performing updates. This setting is in theSettingsscreen,Startup & Environmentsection:
Docker
If you are installing Virtual Accessories For Homebridge in the Homebridge Docker image, you will need to add the following lines to config/startup.sh:
npm uninstall raw-socket
npm install raw-socketThis will ensure that if the version of Node.js is updated in the Docker image, the platform-native library raw-socket will also be updated after the container starts up.
MacOS
If you are installing Virtual Accessories For Homebridge in a Homebridge instance running on macOS, you will need to ensure that Xcode or the Xcode Command Line Tools are installed. To install Xcode or the Xcode Command Line Tools, use the following command:
xcode-select --installSynology
If you are installing Virtual Accessories For Homebridge in a Homebridge instance running on Synology DSM, you will need to ensure that a build toolchain is installed.
This document provides steps for installing the Entware toolchain and other needed packages: DSM 7: Enable Compiling Of Native Modules.
The Synology DSM 7.2.2 Developer Guide provides information to setup the build tools for Synology DSM platforms.
Configuration
You can configure the plugin from the Homebridge UI, or by ediiting the JSON configuration directly in the Homebridge JSON Config editor. In the UI, required fields will be marked with an asterisk (*) and you will not be allowed to save the configuration if the required fields are not filled in.
accessoryID, accessoryName, and accessoryType are required fields for all the accessories.
The configuration is validated on startup, so if an accessory is misconfigured, you will see error entries in the logs to help you correct the configuration. The log entries will indicate the misconfigured fields and look something like this:
[12/21/2024, 12:35:38 AM] [Virtual Accessories Platform] Skipping accessory. Configuration is invalid: { "accessoryID": "12345", "accessoryName": "My Switch", ... }
[12/21/2024, 12:35:38 AM] [Virtual Accessories Platform] Invalid fields: [switchDefaultState]
[!IMPORTANT]
accessoryIDuniquely identifies an accessory and each accessory must have a different value. This is because HomeKit requires a unique and unmodifiable serial number to identify an accessory. The accessory ID acts as a virtual serial number for each accessory that must be unique and unmodifiable. If you do assign the same accessory ID to multiple accessories by mistake, on startup the plugin will skip any accessory that has a duplicate ID and output a message in the logs alerting you to the issue. If you change the value ofaccessoryIDafter saving the config, HomeKit will interpret the change as the "old" accessory having been deleted and a "new" one added. This will cause the Home app to delete any scenes and automations that use the deleted accessory. Some plugins use the accessory name as the unique ID, which means that you cannot easily change the name. Virtual Accessories For Homebridge uses a dedicated field as the unique ID, allowing you to modify the accessory name, if you so choose to.I use random.org to generate unique IDs. While the plugin only requires 5 digits for the IDs, I use 7-digit values between 1,000,000 and 10,000,000. This provides a range of 9 million possible IDs, which greatly reduces the chances of a duplicate.
[!NOTE]
acccessoryNameis the name that will apppear on the Homekit tile for the accessory, as well as the accessory header in the plugin config. While a unique name is not required, it is recommended to assign different names to each accessory. As Vitual Accessories For Homebridge usesaccessoryIDas the unique identifier, you can change the accessory name at any time, if you so choose to. The name change will be propagated to the Home app.
It is recommended to use the Homebridge UI to configure this plugin, as the requirements may vary based on the property value selections. If you choose to manually create or modify the accessory JSON configurations, the following configurations are references and do not cover all of the different value permutations. Please adjust for your requirements.
Accessory Configurations
Doorbell
{
    "name": "Virtual Accessories Platform",
    "devices": [
        {
            "accessoryID": "1234567",
            "accessoryName": "My Doorbell",
            "accessoryType": "doorbell",
            "doorbell": {
                "volume": 100
            }
        }
    ],
    "platform": "VirtualAccessoriesForHomebridge"
}
Fan
{
    "name": "Virtual Accessories Platform",
    "devices": [
        {
            "accessoryID": "1234567",
            "accessoryName": "My Fan",
            "accessoryType": "fan",
            "fan": {
                "defaultState": "off",
                "rotationDirection": "clockwise",
                "rotationSpeed": 80
            }
        }
    ],
    "platform": "VirtualAccessoriesForHomebridge"
}
Garage Door
{
    "name": "Virtual Accessories Platform",
    "devices": [
        {
            "accessoryID": "1234567",
            "accessoryName": "My Garage Door",
            "accessoryType": "garagedoor",
            "accessoryIsStateful": false,
            "garageDoor": {
                "defaultState": "closed",
                "transitionDuration": 7
            }
        }
    ],
    "platform": "VirtualAccessoriesForHomebridge"
}
Heater/Cooler (Celsius)
    "name": "Virtual Accessories Platform",
    "devices": [
        {
            "accessoryID": "1234567",
            "accessoryName": "My Heater",
            "accessoryType": "heatercooler",
            "heatercooler": {
                "type": "auto",
                "temperatureDisplayUnits": "celsius"
                "heatingThresholdCelsius": 20,
                "coolingThresholdCelsius": 25,
            }
        }
    ],
    "platform": "VirtualAccessoriesForHomebridge"
Heater/Cooler (Fahrenheit)
    "name": "Virtual Accessories Platform",
    "devices": [
        {
            "accessoryID": "1234567",
            "accessoryName": "My Heater",
            "accessoryType": "heatercooler",
            "heatercooler": {
                "type": "auto",
                "temperatureDisplayUnits": "fahrenheit"
                "heatingThresholdFahrenheit": 68,
                "coolingThresholdFahrenheit": 77,
            }
        }
    ],
    "platform": "VirtualAccessoriesForHomebridge"
[!NOTE] Internally HomeKit stores temperature values in Celsius and converts to Fahrenheit on the fly, so when values like 70ºF, you may see values displayed like 70.1ºF or 69.9ºF due to conversions between temperature scales. This is unavoidable.
Humidifier/Dehumidifier
    "name": "Virtual Accessories Platform",
    "devices": [
        {
            "accessoryID": "1234567",
            "accessoryName": "My Humidifier",
            "accessoryType": "humidifierdehumidifier",
            "humidifierDehumidifier": {
                "type": "auto",
                "humidifierThreshold": 40,
                "dehumidifierThreshold": 55
            }
        }
    ],
    "platform": "VirtualAccessoriesForHomebridge"
Lightbulb
    "name": "Virtual Accessories Platform",
    "devices": [
        {
            "accessoryID": "1234567",
            "accessoryName": "My Lightbulb",
            "accessoryType": "lightbulb",
            "lightbulb": {
                "defaultState": "off",
                "brightness": 100,
                "type": "white"
            }
        }
    ],
    "platform": "VirtualAccessoriesForHomebridge"
Lock
{
    "name": "Virtual Accessories Platform",
    "devices": [
        {
            "accessoryID": "1234567",
            "accessoryName": "My Lock",
            "accessoryType": "lock",
            "accessoryIsStateful": false,
            "lock": {
                "defaultState": "locked",
                "autoSecurityTimeout": 5
            }
        }
    ],
    "platform": "VirtualAccessoriesForHomebridge"
}
Security System
    "name": "Virtual Accessories Platform",
    "devices": [
        {
            "accessoryID": "1234567",
            "accessoryName": "My Security System",
            "accessoryType": "securitysystem",
            "securitySystem": {
                "defaultState": "disarmed"
            }
        }
    ],
    "platform": "VirtualAccessoriesForHomebridge"
Speaker
    "name": "Virtual Accessories Platform",
    "devices": [
        {
            "accessoryID": "1234567",
            "accessoryName": "My Speaker",
            "accessoryType": "speaker",
            "speaker": {
                "volume": 40
            }
        }
    ],
[!NOTE] After restarting Homebridge, you should see a similar message in the logs, with the code required to pair the speaker accessory in the Home app:
Please add [My Speaker XXXX] manually in Home app. Setup Code: XXX-XX-XXX
Adding a Speaker accessory in the Home app
To add the speaker accessory in the Home app follow these steps:
- In the Home app, tap the + simbol in the upper left and select
Add accessoryin the dropdown menu - In the
Add Accessorypopup, tapMore options...and you should see the speaker accessory listed in theNEARBYsection - Tap the speaker accessory you created
- In the
Uncertified Accessorymodal dialog, tap "Add anyway" - In the
Setup Codepopup, enter the setup code provided in the Homebridge logs (see above) and tapContinue - Finally, tap
Done
Valve
{
    "name": "Virtual Accessories Platform",
    "devices": [
        {
            "accessoryID": "1234567",
            "accessoryName": "My Valve",
            "accessoryType": "valve",
            "valve": {
                "type": "waterfaucet",
                "duration": 0
            }
        }
    ],
    "platform": "VirtualAccessoriesForHomebridge"
}
Window Covering - Blinds, Shades
{
    "name": "Virtual Accessories Platform",
    "devices": [
        {
            "accessoryID": "1234567",
            "accessoryName": "My Blinds",
            "accessoryType": "windowcovering",
            "accessoryIsStateful": false,
            "windowCovering": {
                "defaultState": "closed",
                "transitionDuration": 3
            }
        }
    ],
    "platform": "VirtualAccessoriesForHomebridge"
}
Switch
{
    "name": "Virtual Accessories Platform",
    "devices": [
        {
            "accessoryID": "1234567",
            "accessoryName": "My Switch",
            "accessoryType": "switch",
            "accessoryIsStateful": false,
            "switch": {
                "defaultState": "off",
                "muteLogging": false
            }
        }
    ],
    "platform": "VirtualAccessoriesForHomebridge"
}
Switch with reset timer
{
    "name": "Virtual Accessories Platform",
    "devices": [
        {
            "accessoryID": "1234567",
            "accessoryName": "My Switch",
            "accessoryType": "switch",
            "accessoryIsStateful": false,
            "switch": {
                "defaultState": "off",
                "hasResetTimer": true
            },
            "resetTimer": {
                "duration": {
                    "days": 0,
                    "hours": 0,
                    "minutes": 0,
                    "seconds": 10
                },
                "isResettable": true
            }
        }
    ],
    "platform": "VirtualAccessoriesForHomebridge"
}
Switch with random reset timer
{
    "name": "Virtual Accessories Platform",
    "devices": [
        {
            "accessoryID": "1234567",
            "accessoryName": "My Switch",
            "accessoryType": "switch",
            "accessoryIsStateful": false,
            "switch": {
                "defaultState": "off",
                "hasResetTimer": true
            },
            "resetTimer": {
                "durationIsRandom": true,
                "durationRandomMin": {
                    "days": 0,
                    "hours": 0,
                    "minutes": 5,
                    "seconds": 0
                },
                "durationRandomMax": {
                    "days": 0,
                    "hours": 0,
                    "minutes": 20,
                    "seconds": 0
                },
                "isResettable": true
            }
        }
    ],
    "platform": "VirtualAccessoriesForHomebridge"
}
Switch with companion sensor (sensor triggered on & off by switch state)
{
    "name": "Virtual Accessories Platform",
    "devices": [
        {
            "accessoryID": "1234567",
            "accessoryName": "My Switch",
            "accessoryType": "switch",
            "accessoryIsStateful": false,
            "switch": {
                "defaultState": "off",
                "hasCompanionSensor": true
            },
            "companionSensor": {
                "name": "My Companion Sensor",
                "type": "contact"
            }
        }
    ],
    "platform": "VirtualAccessoriesForHomebridge"
}
Sensor with ping trigger
{
    "name": "Virtual Accessories Platform",
    "devices": [
        {
            "accessoryID": "1234567",
            "accessoryName": "My Ping Sensor",
            "accessoryType": "sensor",
            "sensor": {
                "type": "contact",
                "trigger": "ping"
            },
            "pingTrigger": {
                "host": "192.168.0.200",
                "failureRetryCount": 3,
                "isDisabled": false
            }
        }
    ],
    "platform": "VirtualAccessoriesForHomebridge"
}
[!NOTE] The value for
hostcan be an IPv4 address (192.168.0.1), IPv6 address (2001:0db8:85a3:0000:0000:8a2e:0370:7334), or hostname (www.google.com).
Sensor with cron trigger
{
    "name": "Virtual Accessories Platform",
    "devices": [
        {
            "accessoryID": "1234567",
            "accessoryName": "My Cron Sensor",
            "accessoryType": "sensor",
            "sensor": {
                "type": "contact",
                "trigger": "cron"
            },
            "cronTrigger": {
                "pattern": "* * * * *",
                "zoneId": "America/Los_Angeles",
                "disableTriggerEventLogging": false,
                "isDisabled": false
            }
        }
    ],
    "platform": "VirtualAccessoriesForHomebridge"
}
Sensor with cron trigger with start and end datetimes
{
    "name": "Virtual Accessories Platform",
    "devices": [
        {
            "accessoryID": "1234567",
            "accessoryName": "My Cron Sensor",
            "accessoryType": "sensor",
            "sensor": {
                "type": "contact",
                "trigger": "cron"
            },
            "cronTrigger": {
                "pattern": "* * * * *",
                "zoneId": "America/Los_Angeles",
                "startDateTime": "2024-11-14T19:41:00",
                "endDateTime": "2024-11-30T19:41:00",
                "disableTriggerEventLogging": false,
                "isDisabled": false
            }
        }
    ],
    "platform": "VirtualAccessoriesForHomebridge"
}
[!NOTE] A datetime field might omit the seconds, if the value is
00, so, either of the following are valid and equivalent per ISO standard:"startDateTime": "2024-11-14T19:41:00", "startDateTime": "2024-11-14T19:41",
Sensor with sun events trigger
{
    "name": "Virtual Accessories Platform",
    "devices": [
        {
            "accessoryID": "1234567",
            "accessoryName": "My Sunrise trigger",
            "accessoryType": "sensor",
            "sensor": {
                "type": "contact",
                "trigger": "sunevents"
            },
            "sunEventsTrigger": {
                "event": "sunrise",
                "latitude": "37.226148",
                "longitude": "-115.837523",
                "zoneId": "America/Los_Angeles",
                "isDisabled": false
            }
        }
    ],
    "platform": "VirtualAccessoriesForHomebridge"
}
[!NOTE] Due to limitations in the current version of one of Homebridge UI's dependencies, the Homebridge UI may save additional fields to the JSON config that may not be relevant to a particular accessory. The JSON config for each individual accessory is validated on startup and extranous fields are ignored. In a future release, the startup validation may perform a config cleanup. However. this does not affect the behavior of the accessories, nor does it hurt to manually remove those fields from the JSON config.
Webhook Service Configuration
Virtual Accessories For Homebridge includes a webhook service to update accessory sensors via web calls. There are no changes required to individual accessories' configurations. Simply enabling the webhook service will automatically make all supported virtual sensors available. Curently supported accessory sensors are:
- Humidifier/Dehumidifier humidity sensor. Updating the humidity sensor will trigger the virtual accessory to switch to the appropriate operating state, based on threshold values and device capabilities.
- Heater/Cooler temperature sensor. Updating the temperature sensor will trigger the virtual accessory to switch to the appropriate operating state, based on threshold values and device capabilities.
Enable webhook service
{
    "name": "Virtual Accessories Platform",
    "sensorServer": {
        "enabled": true
    },
}
Enable webhook service with custom port
{
    "name": "Virtual Accessories Platform",
    "sensorServer": {
        "enabled": true,
        "port": "60221"
    },
}
[!NOTE] The default port value is
60221, if no value is specified in the configuratiom. If another service is running on this port, please make sure to select a different port.
Update Humidifier/Dehumidifier humidity sensor
To update a Humidifier/Dehumidifier humidity sensor, issue a POST request with a raw json payload in the request body. Make sure Content-Type: application/json is added to the request headers.
The target URL (replace hostname and port per your setup) will specify the humidity path:
http://localhost:60221/humidityThe raw json payload will contain the accessory id of the humidifier/dehumidifier and the humidity percentage value:
{
    "id": "1234567",
    "value": 35
}
Check out the Wiki page Updating the Humidifier‐Dehumidifier humidity sensor via webhooks for detailed steps for setting up a link between a real humidity sensor and the virtual sensor in a virtual humidifer/dehumidifier accessory.
Update Heater/Cooler temperature sensor
To update a Heater/Cooler temperature sensor, issue a POST request with a raw json payload in the request body. Make sure Content-Type: application/json is added to the request headers.
The target URL (replace hostname and port per your setup) will specify the temperature path:
http://localhost:60221/temperatureThe raw json payload will contain the accessory id of the heater/cooler and the temperature value:
{
    "id": "1234567",
    "value": 50
}
[!NOTE] The temperature value must be specified in the same temperature units (Celsius or Fahrenheit) as specified by the accessory's configuration.
Creative Uses
I started this plugin as a Homebridge 2.0 ready plugin to replace homebridge-dummy, which, along with six other plugins, formed the backbone of my HomeKit automations. Then I got some really odd requests, like a window covering. Okay ... what the heck are you going to do with a virtual window covering?? Well, the user who requested it wanted to use "Siri open/close .." to control their trash bin, as opposed to "Siri on/off .." as would be required with switches. Yup, "I use [your plugin] for my trash" is what every plugin developer loves to hear! 🤣
So here are creative ways people have used this plugin. Maybe they might inspire others.
#
<figure> <figcaption>:bulb: Tutorial: How to add a "fake" Thermostat for each of your HomePods</figcaption>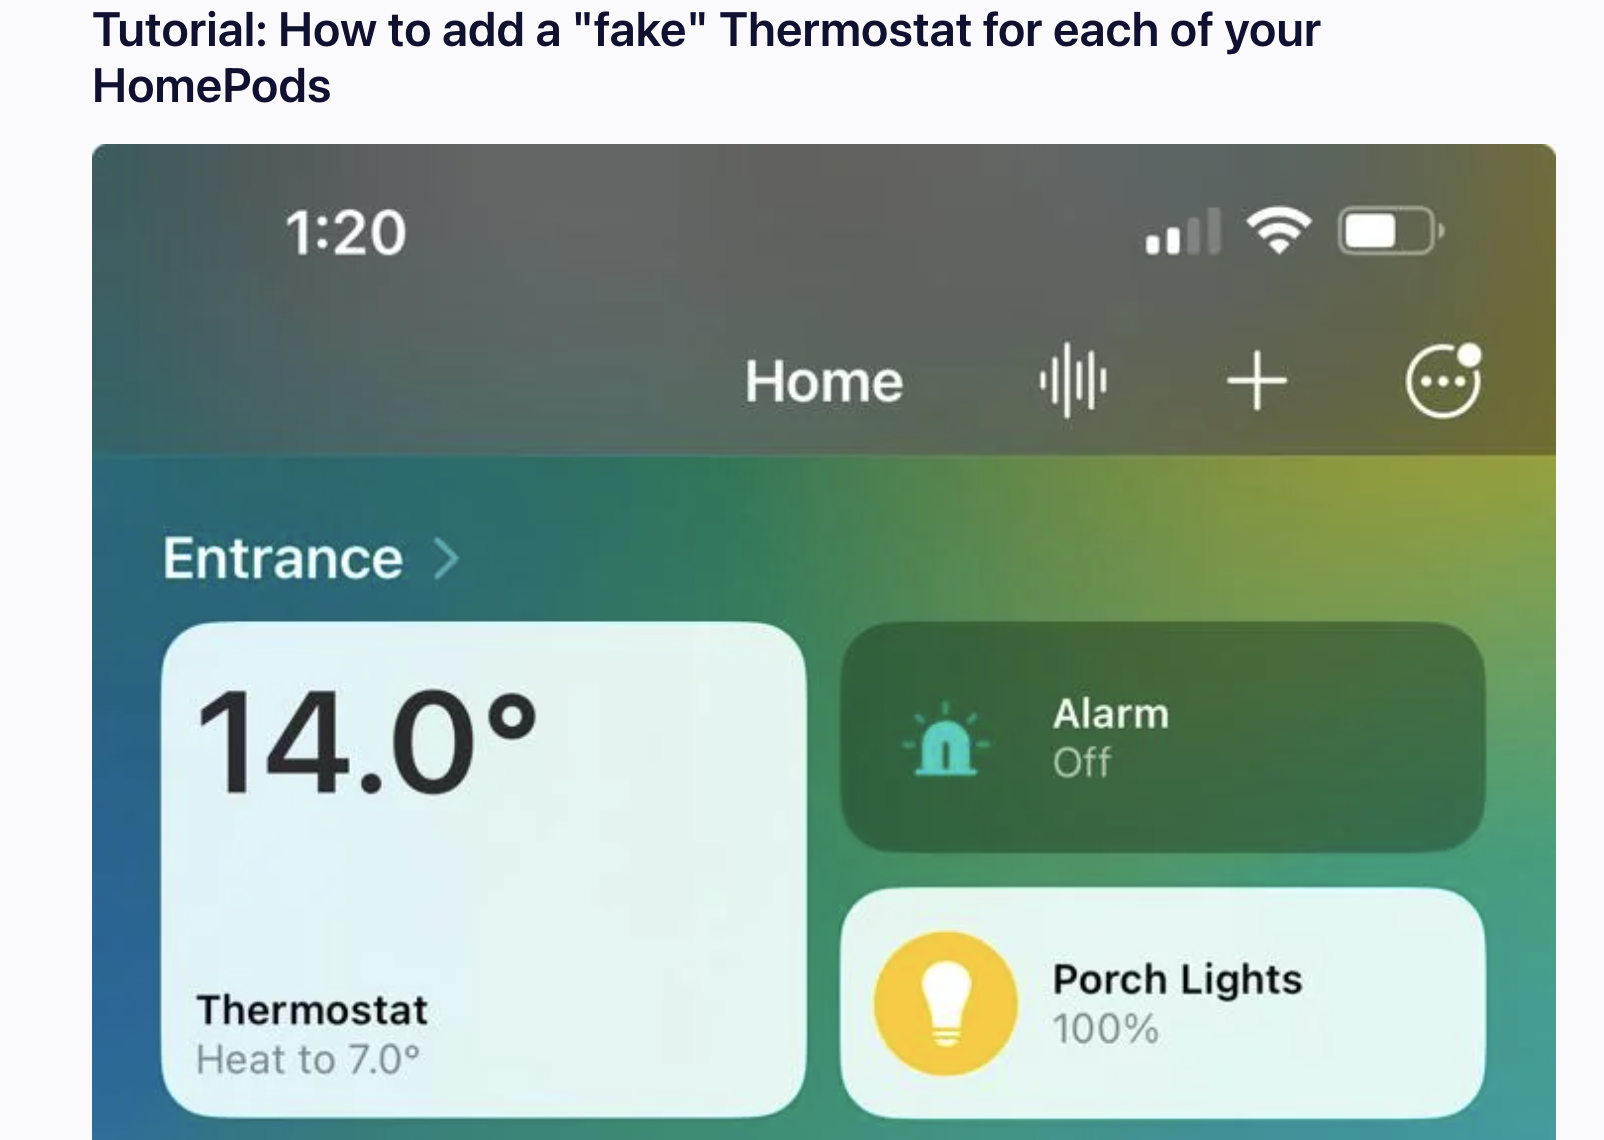 </figure>
Mentions
People using Virtual Accessories For Homebridge!
Patrick Hunt, the content creator of the Make Smart Matter YouTube channel is using Virtual Accessories For Homebridge. His videos are amusing to watch and it's cool to see him use this plugin to solve common day-to-day problems that most people that use HomeKit will encounter at some point.

You can catch a glimpse in the Introduction to Automations in Apple Home video at timestamp 7:46.
He again uses Virtual Accessories for Homebridge in his latest video, Dummies for Dummies Who Use the HomePod.
Known Issues
Issues with Homebridge UI:
- The Humidifier/Dehumidifier accessory is not properly rendered in Homebridge UI. Homebrige UI currently is unable to differentiate between Humidifier-only, Dehumidifier-only, and Humidifier-Dehumidifier accessories, but HomeKit renders it correctly.
- The Heater/Cooler accessory is not properly rendered in Homebridge UI. Homebrige UI currently is unable to differentiate between Heater-only, Cooler-only, and Heater-Cooler accessories, but HomeKit renders it correctly.
Issues with underlying frameworks:
- The ability to order the accessories in the config popup has been rolled back, as it makes it impossible to drag a number slider, for example to set timer values. A bug report has been opened with the underlying framework project and, once this behavior is fixed, this functionality will be restored. The temporary workaround is to manually edit the order of the accessories in the JSON configuration.
Issues with HomeKit:
- The volume on the Doorbell accessory does not work. This is a limitation of Homekit. Per the HomeKit Accessory Protocol specification, the Doorbell is
the primary service of the Video Doorbell Profile.What that means is that a Doorbell should only be added to HomeKit as part of a Video Doorbell and the Home app will not display a standalone Doorbell. This plugin takes advantage of the fact that, although it is not displayed, the Doorbell is still there and the companion switch allows you to interact with it, leading HomeKit to play a chime on the HomePods. Unfortunately, because the Doorbell is not displayed, you cannot configure which HomePod(s) it connects to and you cannot configure the volume. You can set the volume level in the free Eve app, however it will not affect the HomePod volume.
[!NOTE] I considered creating a virtual Video Doorbell accessory, however I ruled it out due to the amount of work required. Also, this functionality is easily implemented with the Homebridge Camera Ffmpeg plugin.
Without a live feed, you will get a black rectangle in the Home app. Here are a few ways that you can display something instead of that black rectangle:
- Configure it without setting a valid
sourceand settingstillImageSourceto the URL of an image.- Configure it by setting
sourceto"-loop 1 -i http://192.168.4.63:8086/image"(wherehttp://192.168.4.63:8086/imageis the URL to a still image) and settingmaxFPSto1.- Configure it by setting
sourceto a live internet traffic cam or nature cam.I have not done this myself, so please refer to the plugin documentation for any questions.
What if I run into a problem?
Check the Wiki. Here you will find entries with instructions in the event of breaking updates. I will also post detailed instructions for using certain functionalities, like the webhook service.
If the Wiki entries do not provide answers to your problem, you can check the #virtual accessories channel on Discord for any notifications, or open a bug report or a support request here on GitHub. Please include log outputs and configuration details to the issue, making sure to remove any sensitive information such as passwords, tokens, etc. The more information you provide, the better I can investigate the issues.
Please open a Feature Request issue if you have any enhancement suggestions or any additional functionality that you would like to see added, or comment on an existing issue if one is already open. If the enhancement suggestion fits within the scope of the plugin, I will consider adding it in a future release.